
Installing Windows 11 on Proxmox VE is no longer a niche lab exercise. Many SMBs use it for legacy apps, virtual desktops, corporate tools, or testing environments. The friction point, however, remains consistent: Windows 11 enforces security requirements that, in a virtual machine, depend entirely on how the VM is built from the very beginning.
The practical reality is that Windows 11 will not install “like usual” on Proxmox unless three pieces are in place:
- UEFI boot (EFI disk / OVMF)
- A virtual TPM (vTPM / TPM state)
- VirtIO drivers (most commonly for storage, so the installer can even see the disk)
If any of these are missing, the process typically fails either with a requirements block or the classic dead-end message: no drives found.
This procedure summarizes how to get the VM ready and complete the installation without getting lost in menus.
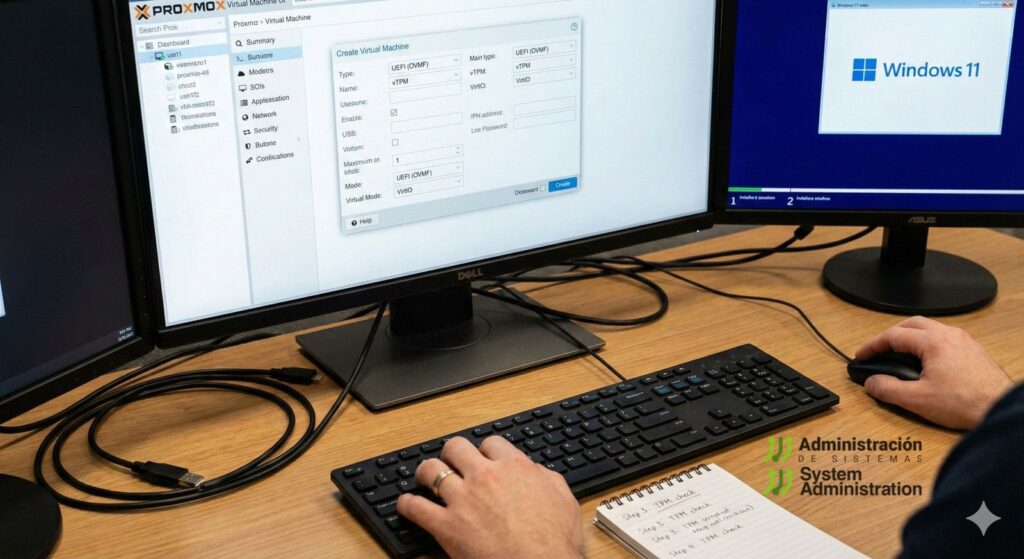
1) VM Preparation: What Windows 11 “Assumes” You Have
Start by creating a new VM in Proxmox (for example, naming it Win11) and selecting your Windows 11 ISO. A key step is adding a second CD-ROM for the VirtIO ISO, because Windows will likely need those drivers during installation.
The two make-or-break settings are:
UEFI boot (EFI Disk / OVMF)
Windows 11 expects UEFI firmware. In Proxmox, that means enabling UEFI and creating an EFI disk.
vTPM (TPM State)
Windows 11’s baseline requirement includes TPM 2.0. In Proxmox, this is handled by adding a TPM device, which stores its state in a dedicated TPM State storage object.
In practice, you will configure:
- an EFI Disk (for UEFI boot), and
- a TPM State (for vTPM persistence).
From there, set the usual parameters:
- CPU
- Memory
- Disk
- Network adapter
Before proceeding, the final hardware list should clearly show:
- Two CD-ROM entries (Windows ISO + VirtIO ISO)
- EFI disk and TPM device/state
2) Windows 11 Installation: The “No Disk Found” Moment
Boot the VM and walk through language and keyboard selection. When you reach the disk selection screen, you may see no available disks.
This is typically not a Proxmox issue—it’s a driver issue. Windows doesn’t include native drivers for some paravirtualized storage controllers (notably VirtIO SCSI) during setup.
Fix: Load the VirtIO SCSI storage driver
- Click Load driver
- Select the VirtIO CD drive (it usually appears as a separate drive letter)
- Navigate to the storage driver folder (commonly
vioscsior equivalent) - Choose the folder for Windows 11
- Install the driver (often shown as Red Hat VirtIO SCSI)
Once the driver is loaded, the disk appears and the installation can proceed normally.
3) The “Interesting” Part: Creating a Local User (No Microsoft Account)
Recent Windows 11 installers strongly push users into signing in with a Microsoft account during OOBE (the first-run setup flow). The guide recommends a practical approach:
Disconnect the network during OOBE
You can temporarily disable the VM network adapter from Proxmox. Even if you use VirtIO networking and Windows doesn’t detect it initially, explicitly disconnecting avoids surprises.
Use the command prompt workaround if needed
At the OOBE step where Windows demands connectivity, you can open a command prompt with:
- Shift + F10 or fn + Shift + F10 with Mac
Then run an OOBE command that typically re-enables the local account path. A widely referenced method is:
OOBE\BYPASSNRO
Depending on Windows build behavior, admins also reference alternatives (e.g., launching a local-only flow). After the reboot, OOBE commonly returns and allows creating a local user without signing into Microsoft.
4) After Install: VirtIO Drivers and Recommended Tweaks
Once the desktop is up, finish the job properly:
Install VirtIO drivers inside Windows
From the VirtIO ISO, install:
- Network drivers (if you don’t have connectivity yet)
- Storage and device drivers
- Any additional guest utilities recommended for Windows VMs
With VirtIO fully installed, the VM typically runs noticeably faster and with less overhead than emulated devices.
Storage optimization note (SSD/NVMe)
One practical reminder: review Windows disk optimization behavior in virtualized environments—especially if the underlying storage is SSD/NVMe. Traditional defragmentation logic should not be treated the same as optimized/TRIM-aware behavior. The goal is to ensure Windows applies the correct “optimize” path rather than destructive or unnecessary routines.
Why This Has Become the “Standard Template” for Proxmox + Windows 11
This method is less about “getting it installed” and more about ensuring it remains stable and operational long-term: consistent boot, TPM compliance, reliable storage performance, and a clean post-install driver state.
In many Proxmox environments, UEFI + vTPM + VirtIO has effectively become the default blueprint for Windows 11 VMs because it reduces surprises and aligns the VM with Microsoft’s tightened security baseline.
FAQ
What must be enabled in Proxmox to avoid Windows 11 blocking installation requirements?
You typically need UEFI (EFI disk / OVMF) and a vTPM device (TPM 2.0 state). Without TPM, Windows 11 commonly blocks installation in standard flows.
Why does the Windows 11 installer fail to detect the disk on Proxmox?
Because Windows setup may lack built-in drivers for VirtIO SCSI (and similar paravirtualized controllers). Loading the driver from the VirtIO ISO via Load driver resolves it.
Which VirtIO drivers should be installed after Windows 11 is installed?
At minimum: storage and network VirtIO drivers, plus any device drivers and guest utilities needed to remove unknown devices and improve performance.
How can Windows 11 be installed on Proxmox with a local user instead of a Microsoft account?
A common approach is to disconnect the network during OOBE and, if necessary, open the command prompt (Shift + F10 or fn + Shift + F10 with Mac) to run an OOBE command that re-enables the local account path. Microsoft may alter these flows over time, so the exact method can vary by build.