
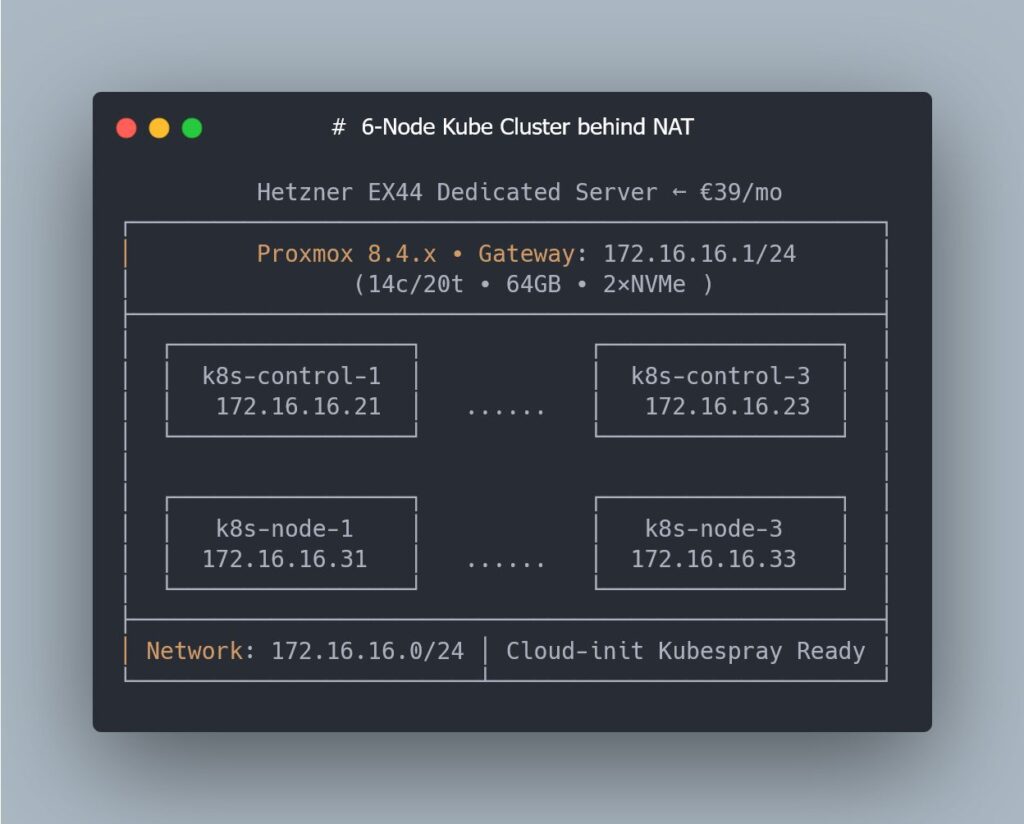
Spinning up a “real” Kubernetes cluster for performance and staging tests usually pushes sysadmins into two uncomfortable options: either put extra pressure on corporate infrastructure, or pay for a dedicated environment that quickly becomes expensive. That’s why this lab setup is so interesting: it runs on a Hetzner EX44 dedicated server (Intel i5-13500 with 14 cores / 20 threads, 64 GB RAM and 2 NVMe drives) for around €39/month, using Proxmox as the hypervisor and Terraform as the IaC layer.
In the ninth part of a highly technical mini-series, the project reaches a particularly relevant point for sysadmins: moving from a single VM to six Kubernetes-ready nodes, with zero clicks in the Proxmox web UI and all the logic captured in Terraform code and Cloud-Init templates.
The goal is clear: build a staging/perf lab that’s fully reproducible, ideal for experimenting with Kubernetes and Kubespray, testing network changes, CNIs, upgrades and synthetic loads—without touching production.
The context: a low-cost bare-metal Kubernetes lab
The lab is built on a Hetzner EX44 dedicated server, a relatively affordable machine that, when used properly, can simulate a multi-node cluster environment:
- CPU: Intel i5-13500 (14c / 20t)
- RAM: 64 GB
- Storage: 2× NVMe
- Hypervisor: Proxmox VE
- Approximate cost: €39/month
On top of this host, everything is orchestrated with Terraform and the Proxmox provider, so each VM, its disk, Cloud-Init config and networking are defined declaratively. The specific objective of this chapter is to reach a standard layout of 3 control-plane nodes and 3 worker nodes, all with homogeneous settings and kernel parameters tuned for Kubernetes.
The bump in the road: Terraform, Proxmox and API latency
Before that 6-VM layout could be deployed, the project ran into a problem many admins will recognise: Terraform operations stuck forever in “Still creating…”, partial state drift and inconsistencies between what Terraform thought existed and what Proxmox was actually running.
The root cause wasn’t the HCL code, but something far more mundane: variable latency between the laptop running Terraform and the Proxmox API. When RTT spiked, some API calls would complete only partially, the provider would lose track of resources, and the state became polluted.
To diagnose the issue, the usual sysadmin toolkit came into play: mtr to trace the route and measure hops to Hetzner’s datacenter. The pattern was consistent: latency spikes at specific times and routes that weren’t always stable.
The fix was pragmatic and effective: move the Terraform execution to a Hetzner Cloud VPS in the same datacenter as the dedicated server. That way, Proxmox API calls now have minimal and stable latency, timeouts disappear and VM clones are consistent again.
For any sysadmin, the takeaway is clear: when automating remote hypervisors with Terraform, where you run Terraform from matters. Running plans “from home” might be good enough for small environments, but as the number of resources grows, it often makes sense to get the automation as close as possible to the datacenter.
Cloud-Init in service of Kubernetes: small tweaks, big impact
Once the latency issue was solved, the next key piece was turning Cloud-Init into the central node-prep mechanism. Before Kubespray can deploy Kubernetes, the VMs’ operating systems must meet some basic requirements:
- Enable the
br_netfilterkernel module
Kubernetes needs to inspect bridged traffic to apply network policies. Without this module, network behaviour won’t match expectations in many setups. - Allow IP forwarding
Cluster nodes act as routers for pod and service traffic. Settings likenet.ipv4.ip_forwardmust be enabled at boot. - Ensure bridged traffic traverses iptables
Settings such asnet.bridge.bridge-nf-call-iptables=1andnet.bridge.bridge-nf-call-ip6tables=1ensure that firewall rules apply to traffic flowing over bridges, which is relevant even if you later move to solutions like Cilium. - Disable swap
By default, Kubernetes does not tolerate active swap. If the system boots with swap enabled, kubelet refuses to start, unless explicitly forced to allow it. In a lab meant to mirror production behaviour, following the official recommendation and running without swap is the sensible choice.
These changes—often applied manually with post-install scripts—have been baked directly into the Cloud-Init templates that Terraform generates for each VM. As a result, every node boots with:
- the right modules loaded,
sysctlparameters properly set,- swap disabled persistently,
- and the rest of the system ready for Kubespray to deploy Kubernetes without complaints.
Even though the roadmap includes Cilium as the CNI later on, the traditional bridge/iptables configuration doesn’t conflict with that choice: Cilium no longer depends on the classic bridging path, and keeping these parameters enabled is harmless.
Cluster layout: 3 control planes + 3 workers, all in code
With those pieces in place, the lab reaches a particularly interesting milestone for sysadmins: a complete 6-VM layout in Proxmox, fully expressed in Terraform.
Key characteristics include:
- 3 control-plane nodes and 3 worker nodes, with identical CPU/RAM/disk profiles (tuned to fit the EX44’s resources).
- Static, predictable IP addresses for each node, both at the Proxmox network level and inside the guest OS.
- Cloud-Init templates extracted into separate
.tftplfiles, generated by Terraform on a per-node basis. - Consistent hostnames, aligned with the inventory that Kubespray will consume.
- Uniform VM configuration across the cluster: q35 machine type, UEFI, virtio for disk and network, etc.
Terraform uses for_each to automatically generate the node set, so adding a fourth worker or changing the number of control-plane machines is as simple as tweaking a map or list in the code. No more “clone VM” and manual editing in the Proxmox UI.
The result is an environment where:
- there’s no need to touch the Proxmox web console to create VMs,
- each deployment is repeatable and tracked in Git,
- and any design change (more RAM per node, extra disk for etcd, etc.) is expressed as a code change.
Operational benefits for sysadmins: from improvisation to reproducibility
For a sysadmin-focused audience, the value of this kind of lab goes well beyond being a “home-lab toy”. A few particularly relevant points:
- Realistic performance testing
Running on a dedicated server with defined resources makes it possible to measure the real impact of Kubernetes, CNI, storage or ingress changes, without the noise introduced by a public cloud virtualization layer. - Controlled failure scenarios
You can simulate node crashes, disk loss, network issues or failed upgrades, and roll back to a known baseline with a simpleterraform destroy && terraform apply. - Living documentation as code
Terraform HCL and Cloud-Init templates act as up-to-date technical documentation for how the environment should look. There’s no dependency on stale wikis or undocumented manual steps. - Alignment with modern IaC practices
Managing an on-prem (or “cheap dedicated”) hypervisor with Proxmox and Terraform fits nicely into corporate environments already working with Ansible, GitLab CI, deployment pipelines and change controls.
What’s next: NAT, access and Kubespray
While this part of the series focuses on preparing the VMs, the next challenge is already on the table: how to access six nodes sitting behind NAT in Hetzner comfortably and securely.
For many admins, this means thinking about:
- a bastion host or jump box,
- SSH tunnels or VPNs,
- specific firewall rules to restrict access,
- and how (or whether) to expose the Kubernetes control plane or cluster services.
Only after that connectivity puzzle is solved will the lab move into the phase many are waiting for: full provisioning with Kubespray, including etcd, control planes, workers, CNI and add-ons deployed on top of the prepared base.
FAQs about the Kubernetes-on-Proxmox lab for sysadmins
Why choose Proxmox + Terraform instead of running Kubernetes directly on bare metal?
For a lab focused on testing and reproducibility, the Proxmox layer brings flexibility: you can recreate “clean” nodes in minutes, tweak virtual hardware settings, take snapshots and experiment with failure scenarios without reinstalling the physical host. Terraform then makes the whole topology versionable and auditable.
Does a 3-control-plane + 3-worker cluster make sense on a server with 64 GB RAM?
Yes, as long as you size each VM properly. It’s not meant for heavy production workloads, but it’s more than enough for:
- deploying a full HA cluster,
- testing CNIs, controllers, operators and upgrades,
- and running realistic small-scale workloads and benchmarks.
Is it still relevant to configure br_netfilter and iptables bridge settings if you plan to use Cilium?
Even though Cilium no longer depends on the classic bridge/iptables path, keeping these parameters enabled doesn’t cause issues and provides compatibility for hybrid scenarios or other components. In a lab, it adds flexibility and reduces surprises.
Why disable swap in a performance/staging lab and not just in production?
Because one of the goals of this lab is to reproduce production-like conditions. Kubernetes is designed to run without swap for reasons of stability and resource predictability. Keeping swap disabled from the start avoids false positives and behaviours that wouldn’t match a serious production environment.
Source: LinkedIN de Vitaly Ruzhnikov