
For years, showing a local project to a client, sending a quick demo to a teammate, or testing a webhook from home usually meant one of three things: opening ports on the router, wrestling with NAT, or relying on services like ngrok. Lately, though, a simpler option has been spreading among developers and technical teams: Cloudflare Tunnel in “Quick Tunnels” mode, run through cloudflared with a single command.
The pitch is straightforward — and, when used correctly, it largely holds up: turn a local service into a public URL reachable from anywhere, with automatic HTTPS, without exposing ports directly or touching home firewall rules.
One command and you’re live… with an important caveat
The snippet that’s been making the rounds is usually boiled down to this:
brew install cloudflared
cloudflared tunnel --url http://localhost:8080
Code language: JavaScript (javascript)
That second command is the key point: the --url flag doesn’t point to a “local domain.” It must point to the actual local URL of the service you want to publish — for example http://localhost:3000, http://127.0.0.1:5173, or http://localhost:8080.
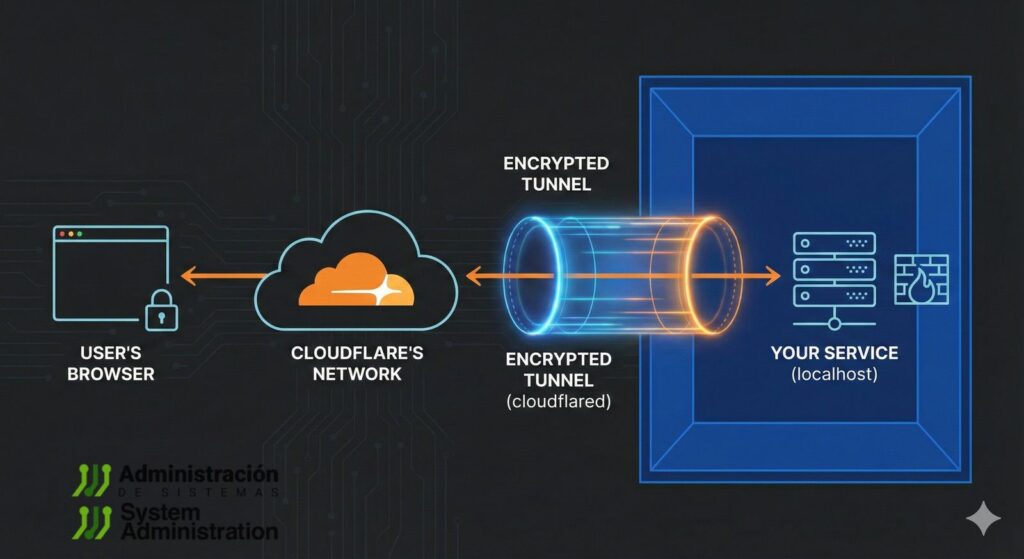
When you run it, cloudflared creates an ephemeral tunnel and returns a public URL (typically under trycloudflare.com) and it’s commonly available over HTTPS right away. That link can be shared instantly so someone else can view your in-progress site or hit your endpoint from outside your network.
“No signup, no cost”: when that’s true — and when it isn’t
The “no signup” message is accurate for Quick Tunnels, which are meant for fast testing and quick demos without account setup or configuration files.
But it’s worth separating two different use cases:
- Quick Tunnels (ephemeral): designed for rapid testing, short demos, and one-off validations. Usually no account is required, and the URL often changes when you restart.
- Persistent tunnels with your own domain: if you want a stable URL under a domain you control (e.g.,
demo.yourdomain.com), you’ll typically need to authenticate cloudflared, create a managed tunnel, configure DNS/routes, and keep it running as a service — meaning account and domain configuration are part of the flow.

On cost: the quick-start experience is built to be frictionless, and many users operate within free tiers. That said, once you move into custom domains, organizational controls, or advanced Zero Trust features, limits and plan conditions can vary depending on what you’re enabling.
Why it’s catching on: the real value is what you don’t have to do
The appeal isn’t just a sharable link. It’s everything you avoid:
- No need to open inbound ports on your router or expose your service directly to the public internet.
- HTTPS is automatic, which matters for integrations that require TLS (OAuth callbacks, webhooks, secure API endpoints).
- It works behind NAT, including networks where port forwarding is impossible or not allowed.
That makes it handy for everyday tasks: showing a site under development, testing an endpoint from a phone on mobile data, or quickly verifying that a third-party system can reach your machine during a short troubleshooting session.
What to keep in mind before you share the link
Fast doesn’t mean “risk-free.” Publishing localhost to the world can be dangerous if done carelessly:
- Don’t expose admin panels or environments with real customer data.
- Services not designed for public traffic can behave unpredictably (timeouts, crashes, errors).
- For longer tests, an ephemeral URL can be a deal-breaker — if it changes, integrations break.
That’s where persistent tunnels (with account management) and access controls become more appropriate for serious work: not just because the URL is stable, but because you can add authentication, policies, and route-based rules depending on the setup.
Is it an ngrok alternative? Yes — but it’s not the same story
In day-to-day use, many describe it as “ngrok without the hassle.” In practice, cloudflared Quick Tunnels are a low-friction way to share and test with HTTPS, while other tunnel products may offer different strengths (reserved domains, session management, protocol features, specific security controls) depending on provider and plan.
Put simply: for a quick HTTPS demo, cloudflared is hard to beat on speed and simplicity. For repeatable environments, larger teams, or production-like integrations, it usually makes sense to move to a persistent tunnel with a domain and proper access controls — or compare tools based on your requirements.
FAQ
How do you share a local server with HTTPS using cloudflared on macOS?
After installing via Homebrew, run cloudflared tunnel --url http://localhost:PORT. It generates a public URL (often under trycloudflare.com) with HTTPS for reaching your local service.
Do Cloudflare “Quick Tunnels” require an account or signup?
Quick Tunnels are typically designed to work without creating an account or setting up configuration files. Persistent tunnels with your own domain generally require authentication and additional configuration.
Why does the tunnel URL change, and how can you get a stable address?
Quick Tunnels are intended for fast tests, and the URL may change when restarted. For a stable URL, use a persistent tunnel tied to a domain and configured with DNS/routes.
Is it safe to expose localhost with cloudflared to show a client a demo?
It’s useful for demos, but it’s best to avoid exposing sensitive panels or real data. For anything longer-running or higher-risk, use access controls and a persistent configuration instead of an ephemeral link.
Source: Cloudflare tunnel